Analysis of cross-sections is a fundamental requirement in structural design. Accurate cross-sectional properties are crucial for determining displacements, natural frequencies, and stresses in elements subjected to complex loading conditions. However, when it comes to calculating warping properties—especially for arbitrary or composite geometries—traditional methods fall short.
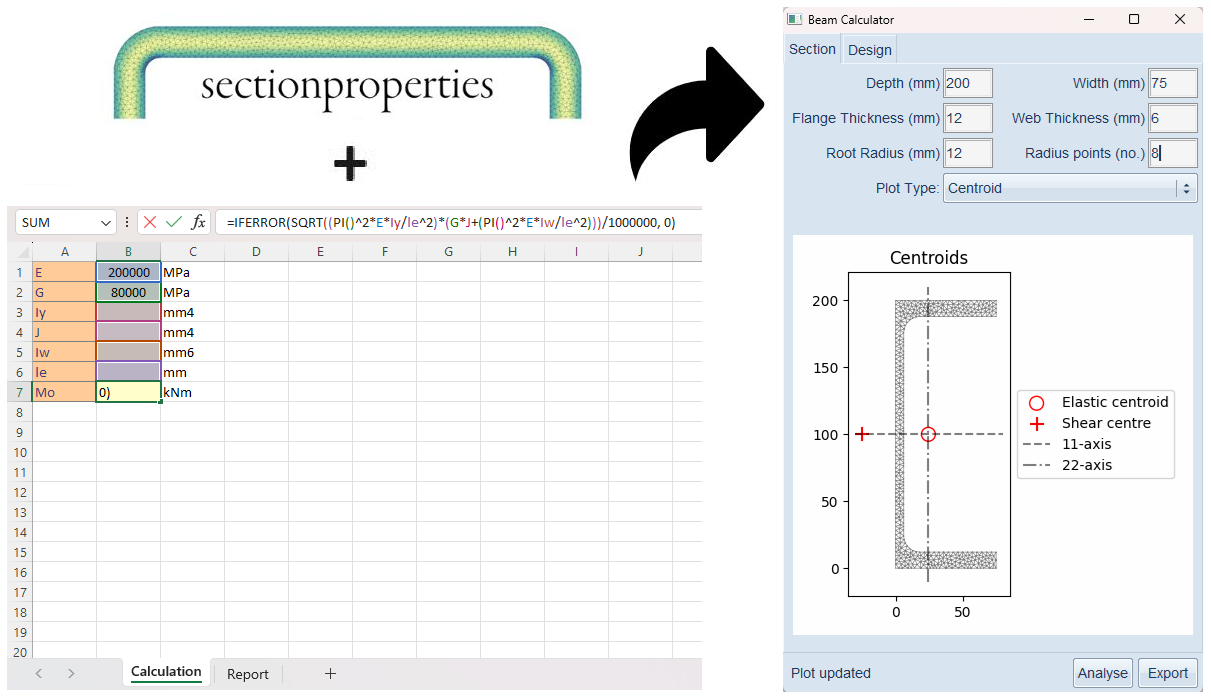
sectionproperties is an open-source Python package that changes the game. Unlike proprietary solutions like RSECTION, ShapeDesigner SaaS, or CADRE Profiler, sectionproperties is freely accessible under MIT license and offers a comprehensive API that supports both engineering practice and research. It uses the finite element method to compute geometric and warping properties, visualize stress distributions, and handle any shape or material combination, including those with internal holes. It’s an all-in-one solution providing a pre-processor, analysis engine, and post-processor.
With our GUI scripting interface, you can create a fully functional desktop application by integrating the sectionproperties library directly into your custom Excel calculations. This integration allows you to:
- Simplify Complex Calculations: Automate the determination of geometric and warping properties for any cross-section within your custom Excel environment.
- Boost Productivity: Leverage the familiarity of Excel combined with the analytical power of sectionproperties, packaged into a user-friendly desktop app tailored to your specific needs.
- Secure Your Work: Protect your custom Excel calculations with password protection, ensuring that your formulas and data remain secure from unauthorized modifications.
This approach provides a seamless, customized solution for engineers who require advanced analysis without compromising on security, accessibility, or convenience.
This post is aimed to provide a concrete example of how this can be achieved and how you can transform your engineering analysis with this powerful, integrated solution. By following steps below, you would have a working app, as per screenshots below, which calculates the “reference buckling moment (Mo)” of a PFC section as per AS4100-2020. However, please note that this procedure can be similarly applied to any complex section such as light gauge steel sections.
| NOTE | This example is included in the latest version of Y3A (Download). |

Our sample app performs the code compliance check using an Excel spreadsheet. This method is particularly useful since most engineers are comfortable with writing Excel calculations, making it easy to distribute the development workload among team members. The Excel file contains two tabs:
- Calculation tab is used for calculations logic.
- Report tab is PDF friendly outline only including desired information.


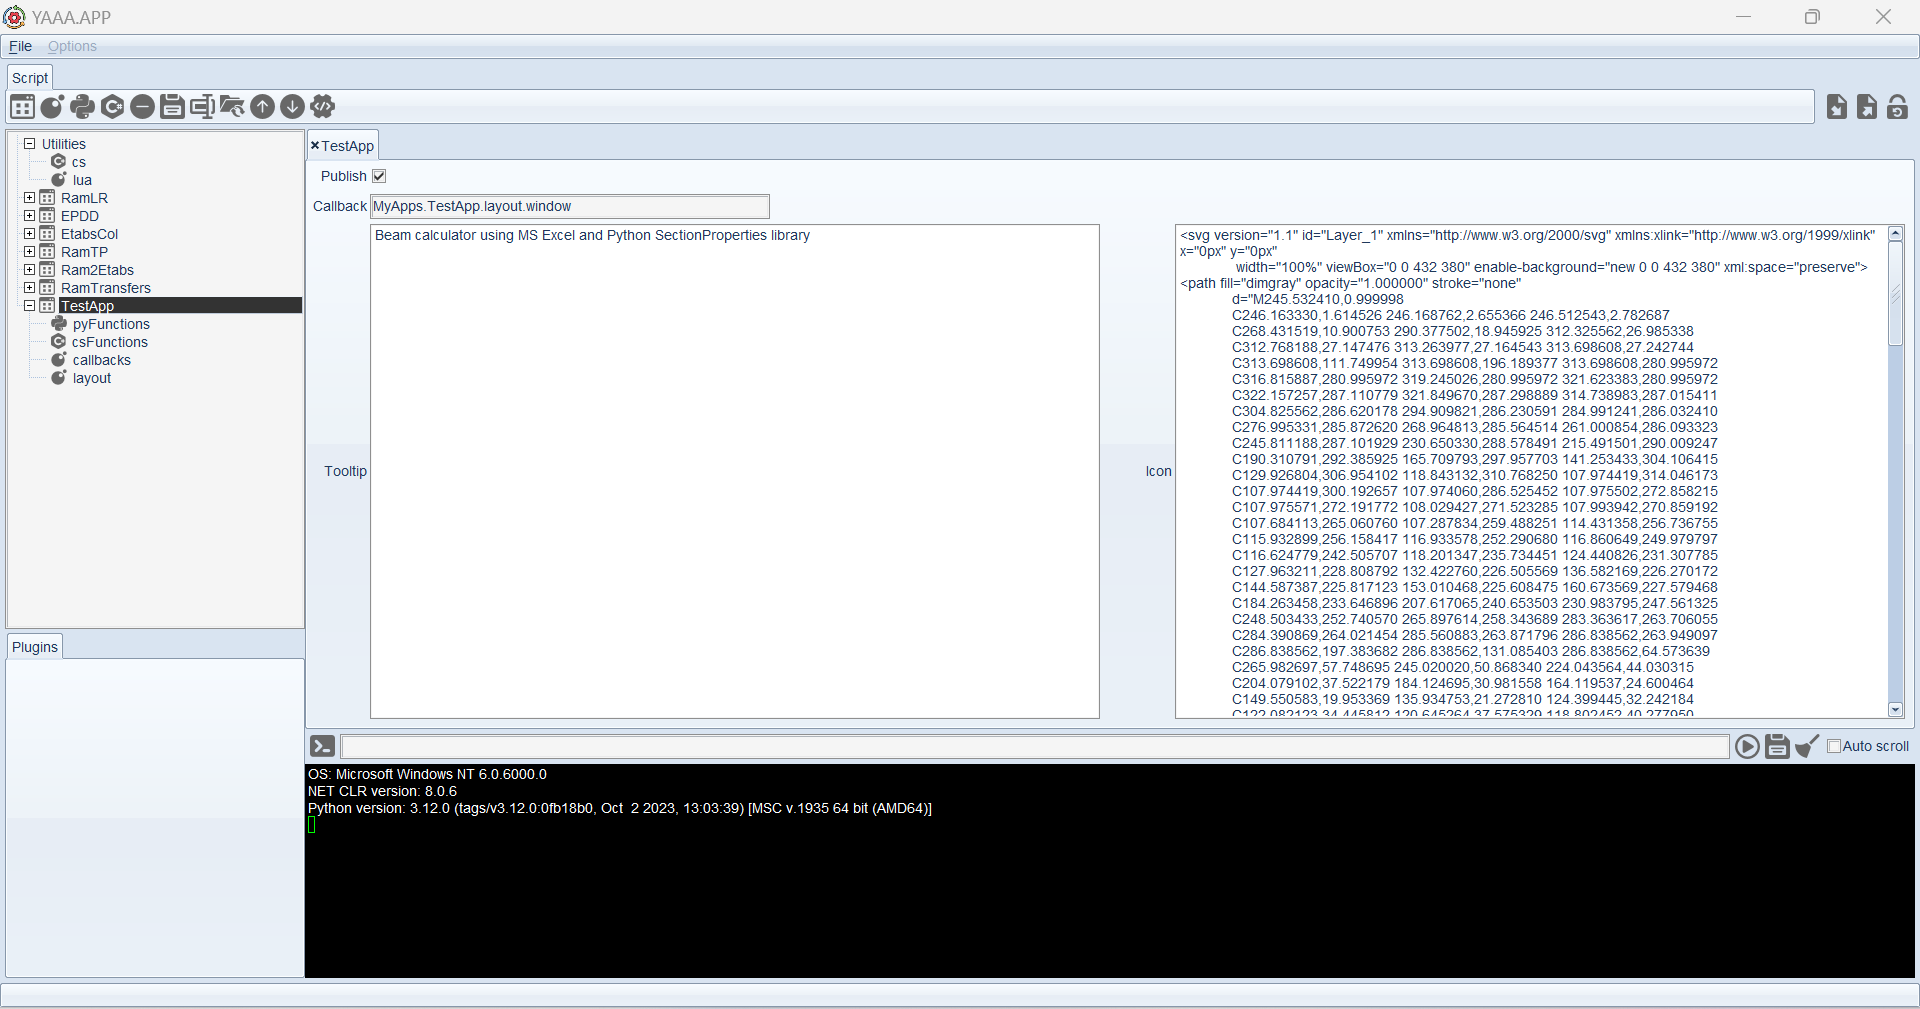
The scripting part of our app contains:
- App settings such as app icon and tooltip
- Python functions for interfacing sectionproperties library
- C# functions for interfacing Excel calculation engine
- callbacks and layout Lua functions for defining the gui
| NOTE | Being an scripting interface, Y3A processes the scripts in the order shown in the project browser. To ensure that function calls do not fail, ensure that the scripts are compiled prior to accessing their variables/functions. i.e. place callbacks above the layout in the tree browser as callback functions must be defined prior to assigning them to the gui elements. |
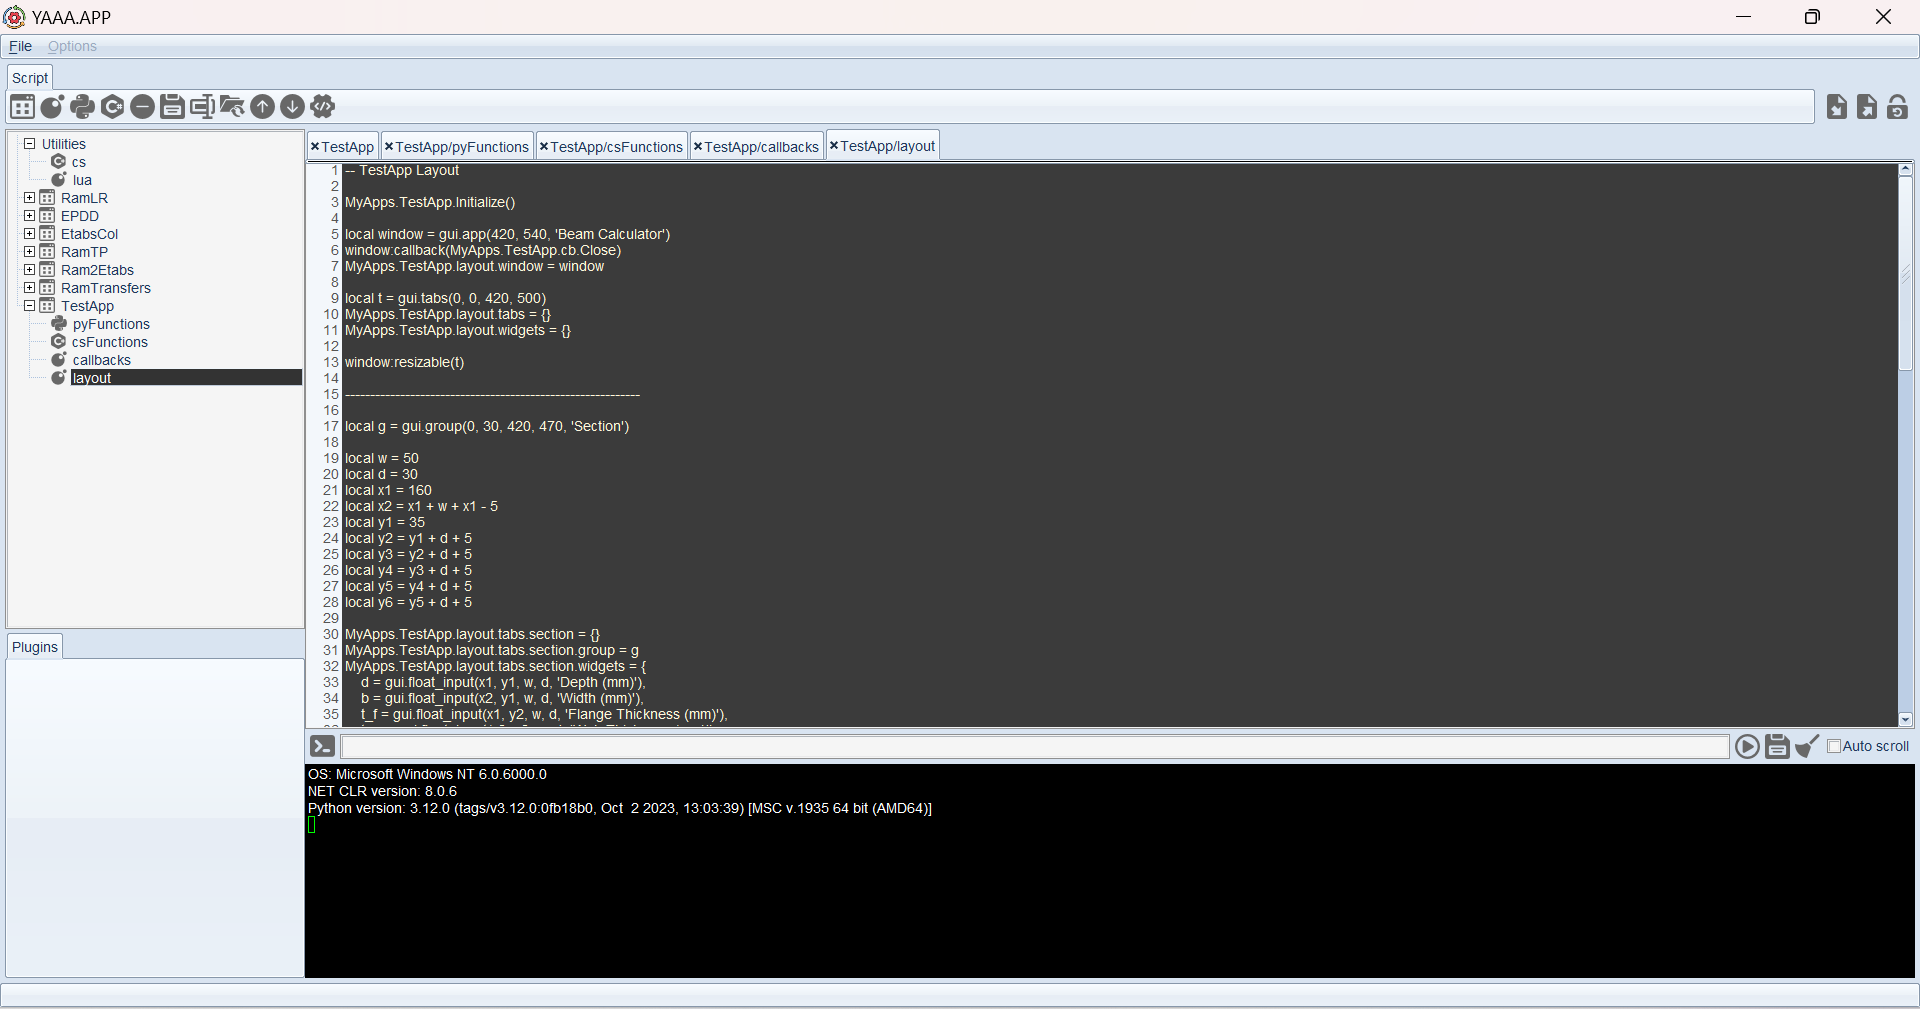
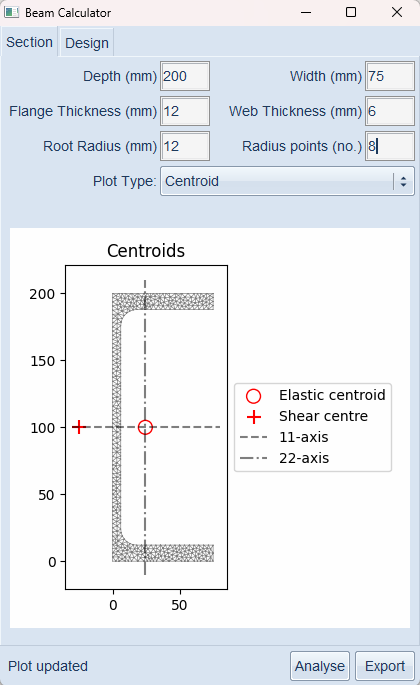
First we start with defining the layout of the app. The app contains two tabs; one for defining the section geometry and the other one for setting the Excel file inputs.
| NOTE | Refer to Documentation page for a complete list of available gui elements. |
-- TestApp Layout

MyApps.TestApp.Initialize() -- call 'Initialize' function saved in the nested MyApps.TestApp table

local window = gui.app(420, 660, 'Beam Calculator')
window:callback(MyApps.TestApp.cb.Close)
MyApps.TestApp.layout.window = window

local t = gui.tabs(0, 0, 420, 620)
MyApps.TestApp.layout.tabs = {}
MyApps.TestApp.layout.widgets = {}

window:resizable(t)

-----------------------------------------------------------

local g = gui.group(0, 30, 420, 590, 'Section')

local w = 50
local d = 30
local x1 = 160
local x2 = x1 + w + x1 - 5
local y1 = 35
local y2 = y1 + d + 5
local y3 = y2 + d + 5
local y4 = y3 + d + 5
local y5 = y4 + d + 5
local y6 = y5 + d + 5

MyApps.TestApp.layout.tabs.section = {}
MyApps.TestApp.layout.tabs.section.group = g
MyApps.TestApp.layout.tabs.section.widgets = {
    d = gui.float_input(x1, y1, w, d, 'Depth (mm)'),
    b = gui.float_input(x2, y1, w, d, 'Width (mm)'),
    t_f = gui.float_input(x1, y2, w, d, 'Flange Thickness (mm)'),
    t_w = gui.float_input(x2, y2, w, d, 'Web Thickness (mm)'),
    r = gui.float_input(x1, y3, w, d, 'Root Radius (mm)'),
    n_r = gui.float_input(x2, y3, w, d, 'Radius points (no.)'),

    plotType = gui.choice(x1, y4, 420-x1-5, d, 'Plot Type:'),
    plot = gui.box(10, y6, 400, 400)
}

g:resizable(MyApps.TestApp.layout.tabs.section.widgets.plot)

MyApps.TestApp.layout.tabs.section.widgets.plotType:add('Geometry')
MyApps.TestApp.layout.tabs.section.widgets.plotType:add('Centroid')
MyApps.TestApp.layout.tabs.section.widgets.plotType:add('Mesh')
MyApps.TestApp.layout.tabs.section.widgets.plotType:tooltip('Select the type to update the plot')
MyApps.TestApp.layout.tabs.section.widgets.plotType:callback(MyApps.TestApp.cb.UpdatePlot)

g:done()

-----------------------------------------------------------

local g = gui.group(0, 30, 420, 590, 'Design')

local function AddInput(x, y, label, cell)
    local i = gui.input(x, y, 50, 30, label)
    i:callback(MyApps.TestApp.cb.NumberInput, {i, cell}) -- Pass multiple data to the callback function in a table
    return i
end

MyApps.TestApp.layout.tabs.design = {}
MyApps.TestApp.layout.tabs.design.group = g
MyApps.TestApp.layout.tabs.design.widgets = {
    E = AddInput(100, 35, 'E (MPa)', 'E'),
    G = AddInput(100, 70, 'G (MPa)', 'G'),
    le = AddInput(100, 105, 'le (mm)', 'le'),
    dummy = gui.box(415, 465, 5, 5)
}

g:resizable(MyApps.TestApp.layout.tabs.design.widgets.dummy)

g:done()

-----------------------------------------------------------

t:resizable(g)
t:done()

local o = gui.box(5, 625, 200, 30)
MyApps.TestApp.layout.widgets.message = o
o:align(ALIGN_INSIDE | ALIGN_LEFT)

local o = gui.button(290, 625, 60, 30, 'Analyse')
MyApps.TestApp.layout.widgets.analyse = o
o:tooltip('Analyse section for geometry and plastic properties')
o:callback(MyApps.TestApp.cb.AnalyseSection)

local o = gui.button(355, 625, 60, 30, 'Export')
MyApps.TestApp.layout.widgets.export = o
o:tooltip('Print report to PDF')
o:callback(MyApps.TestApp.cb.Export)
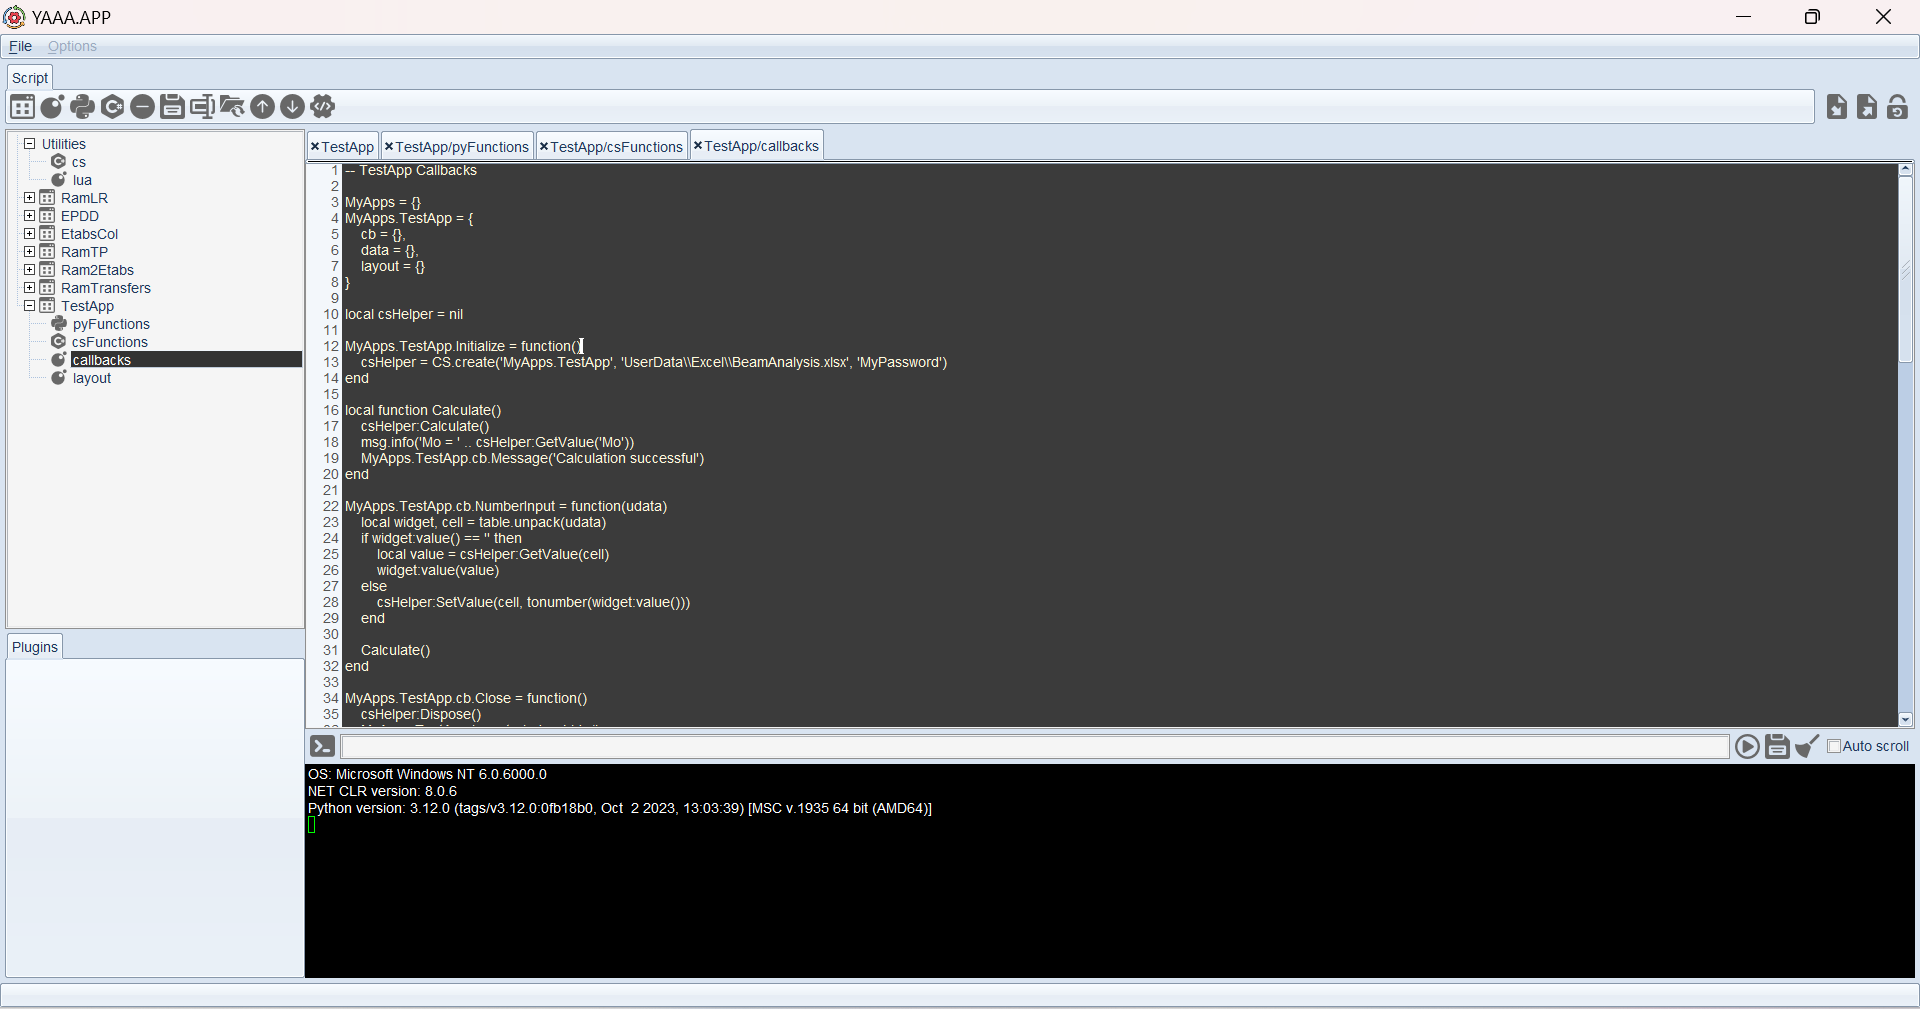
window:done()Next we continue by defining the callback functions which are triggered when user interacts with the app.
-- TestApp Callbacks

MyApps = {}
-- a nested table to contain all app data used outside current scope. This helps keeping the apps organized.
MyApps.TestApp = {
    cb = {},
    data = {},
    layout = {}
}

-- these variables are only accessed here so not defined inside MyApps.TestApp
local csHelper = nil
local section = nil

MyApps.TestApp.Initialize = function()
    -- Create an instance of 'MyApps.TestApp' defined in helper C# class. Passes the excel file path and password as constructor arguments.
    csHelper = CS.create('MyApps.TestApp', 'UserData\\Excel\\BeamAnalysis.xlsx', 'MyPassword')
end

Message = function(msg)
    MyApps.TestApp.layout.widgets.message:label(msg)
    gui.check()
end

local function Calculate()
    csHelper:Calculate()
    msg.info('Mo = ' .. csHelper:GetValue('Mo'))
    Message('Calculation successful')
end

MyApps.TestApp.cb.NumberInput = function(udata)
    local widget, cell = table.unpack(udata) -- unpack the callback data
    if widget:value() == '' then
        widget:value(csHelper:GetValue(cell))
    else
        csHelper:SetValue(cell, tonumber(widget:value()))
    end

    Calculate()
end

local function SetSectionProperties()
    csHelper:SetValue('J', tonumber(section:J()))
    csHelper:SetValue('Iw', tonumber(section:Iw()))
    csHelper:SetValue('Iy', tonumber(section:Ic()[2]))
end

MyApps.TestApp.cb.AnalyseSection = function()
    section = PY.create("PFC",
        tonumber(MyApps.TestApp.layout.tabs.section.widgets.d:value()),
        tonumber(MyApps.TestApp.layout.tabs.section.widgets.b:value()),
        tonumber(MyApps.TestApp.layout.tabs.section.widgets.t_f:value()),
        tonumber(MyApps.TestApp.layout.tabs.section.widgets.t_w:value()),
        tonumber(MyApps.TestApp.layout.tabs.section.widgets.r:value()),
        tonumber(MyApps.TestApp.layout.tabs.section.widgets.n_r:value()))

    section:Analyse()

    SetSectionProperties()

    Message('Successfully analysed section')
end

MyApps.TestApp.cb.UpdatePlot = function()
    local plot = MyApps.TestApp.layout.tabs.section.widgets.plot
    local plotType = MyApps.TestApp.layout.tabs.section.widgets.plotType

    if(not(plotType:changed())) then
        do return end
    end
    local type = plotType:text()

    local img_data = nil
    local w = plot:w()
    local h = plot:h()

    if type == 'Geometry' then
        img_data = section:GeometryPlot(w, h)
    elseif type == 'Centroid' then
        img_data = section:CentroidPlot(w, h)
    else
        img_data = section:MeshPlot(w, h)
    end

    local img = plot:image()
    if (img~=nil) then
        gui.remove(img)
    end
    img = gui.png_image(type, img_data)
    plot:image(img)
    plot:parent():redraw()
    Message('Plot updated')
end

MyApps.TestApp.cb.Export = function()
    local chooser = gui.native_file_chooser()
    chooser:filter(ext)
    chooser:show()
    path = chooser:filenames(1)
    if path == nil then do return end end
    csHelper:Export(path);
end

MyApps.TestApp.cb.Close = function()
    csHelper:Close()
    section:Close()
    Message('')
    MyApps.TestApp.layout.window:hide()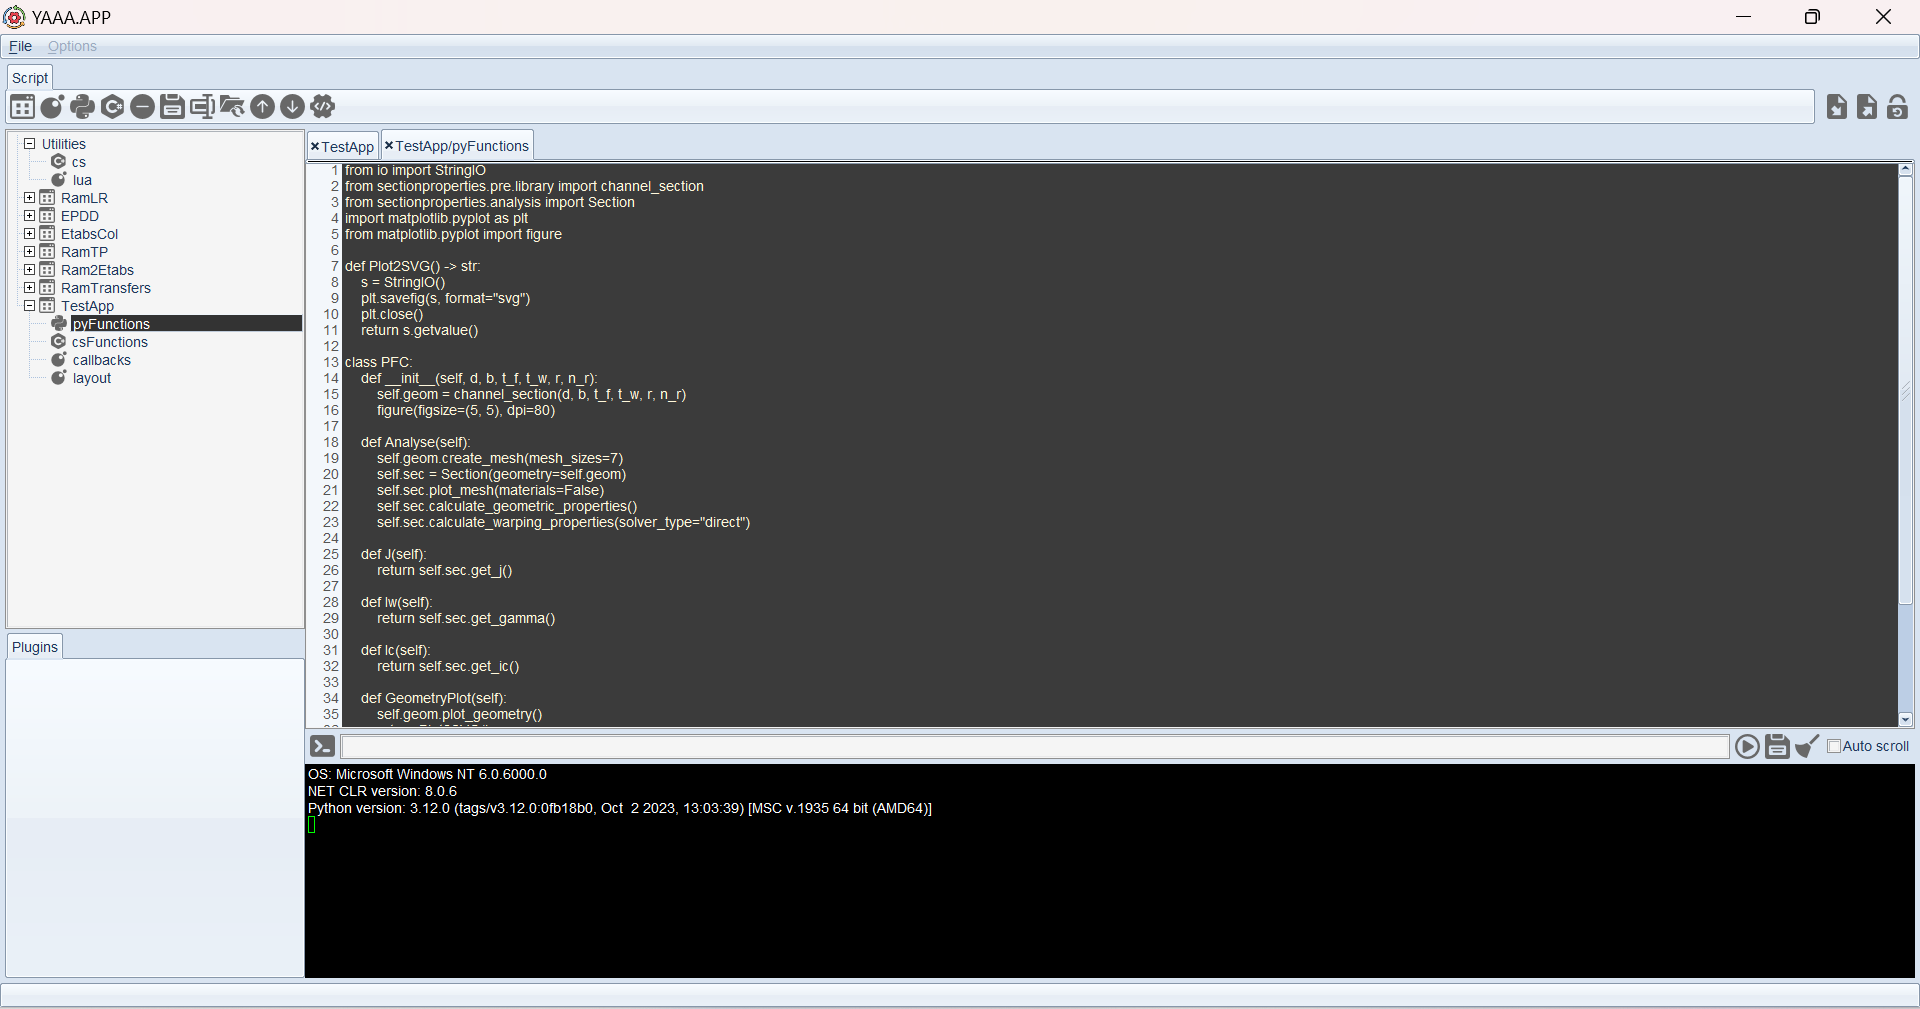
endThen we create a Python class which provides a clean interface for calling sectionproperties functions inside Lua callbacks.
import io
import base64
import numpy as np
import matplotlib.pyplot as plt
from matplotlib.pyplot import figure
from sectionproperties.pre.library import channel_section
from sectionproperties.analysis import Section

def Plot2PNG():
    buffer = io.BytesIO() # A memory storage to save the figure data
    plt.savefig(buffer, format='png')
    plt.close()
    png = buffer.getvalue() # Write figure data to the buffer
    encoded = base64.b64encode(png).decode('utf-8') # Convert binary data to string so that it can be sent back to Lua
    return encoded

class PFC:
    def __init__(self, d, b, t_f, t_w, r, n_r): # Refer to sectionproperties documentation for codes in this section
        self.geom = channel_section(d, b, t_f, t_w, r, n_r)

    def Analyse(self): # Refer to sectionproperties documentation for codes in this section
        self.geom.create_mesh(mesh_sizes=7)
        self.sec = Section(geometry=self.geom)
        self.sec.plot_mesh(materials=False)
        self.sec.calculate_geometric_properties()
        self.sec.calculate_warping_properties(solver_type="direct")

    def SetPlotSize(self, w, h):
        png_dpi = 100
        fig, ax = plt.subplots(figsize=(w/png_dpi, h/png_dpi), dpi=png_dpi)
        return ax

    def J(self):
        return self.sec.get_j()

    def Iw(self):
        return self.sec.get_gamma()

    def Ic(self):
        return self.sec.get_ic()

    def GeometryPlot(self, w, h):
        ax = self.SetPlotSize(w, h)
        self.geom.plot_geometry(ax = ax)
        return Plot2PNG()

    def CentroidPlot(self, w, h):
        ax = self.SetPlotSize(w, h)
        self.sec.plot_centroids(ax = ax)
        return Plot2PNG()

    def MeshPlot(self, w, h):
        ax = self.SetPlotSize(w, h)
        self.sec.plot_mesh(ax = ax)
        return Plot2PNG()

    def Close(self):
        del self.geom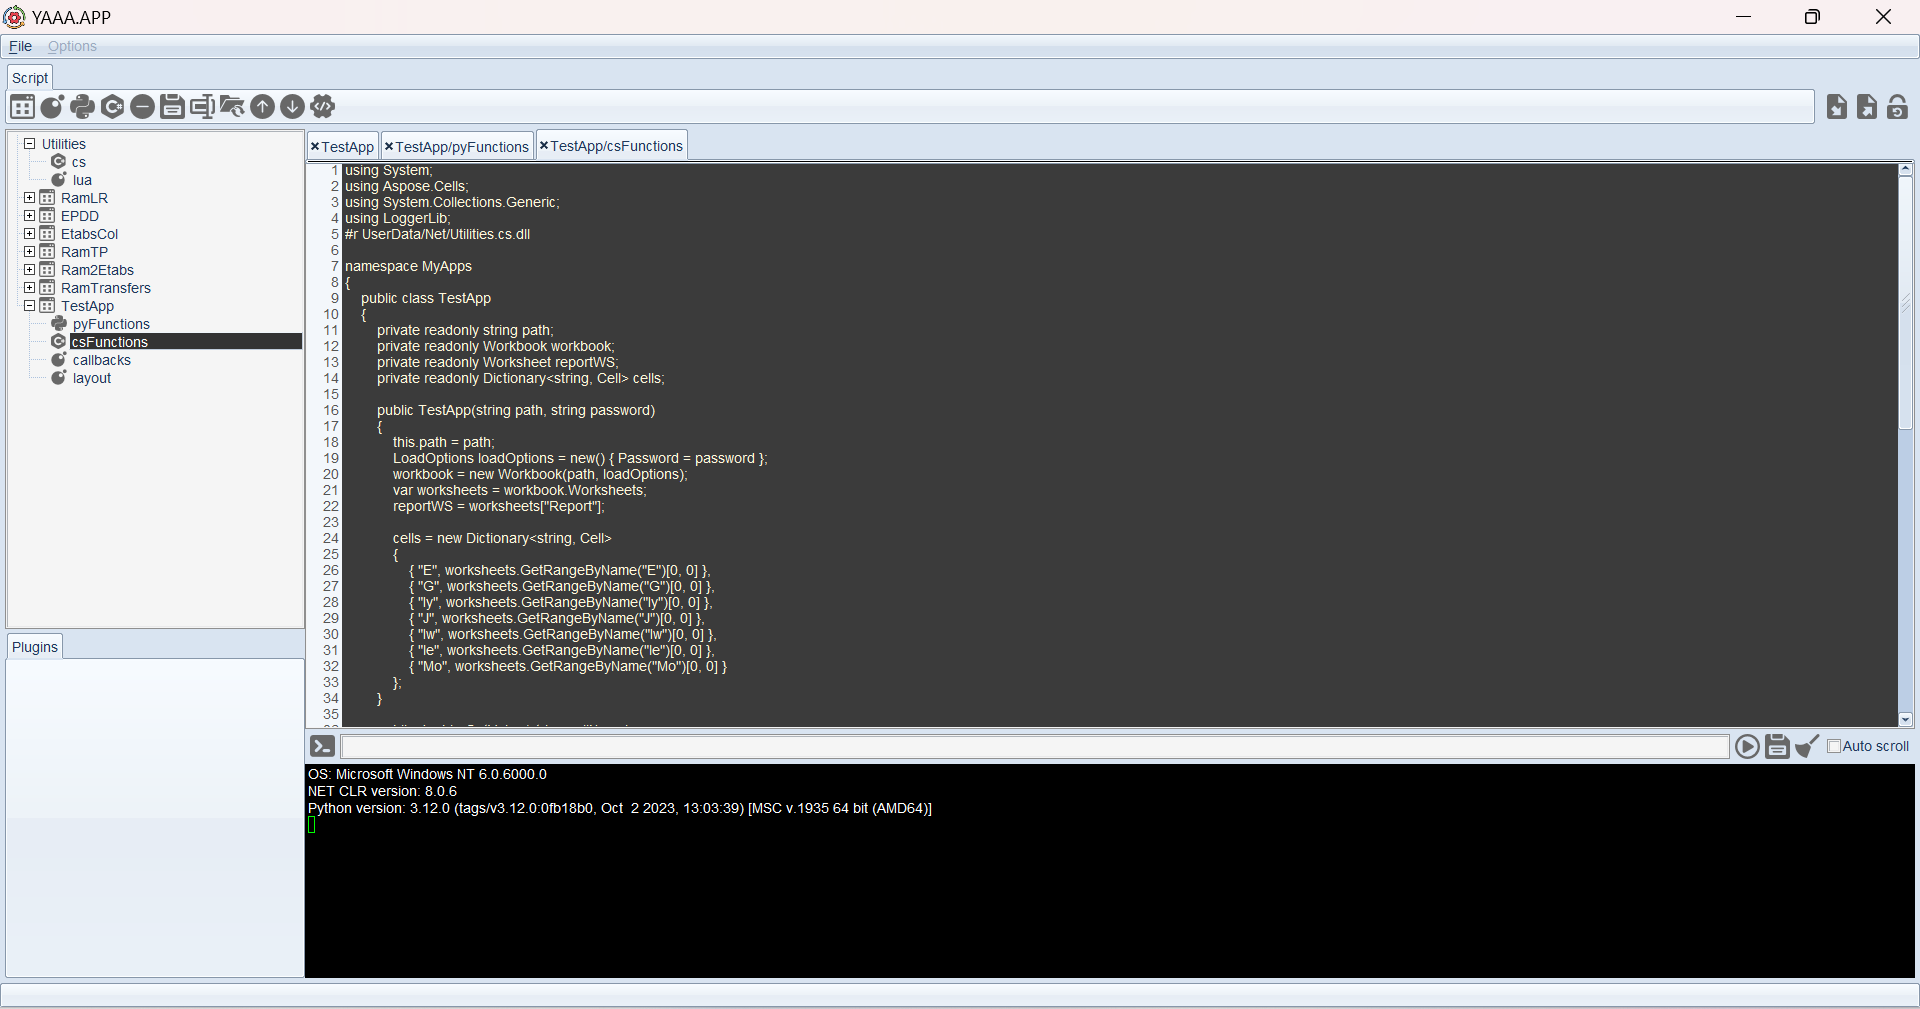
del self.secFinally we define a C# class to simplify Excel engine API calls from Lua callbacks.
using System;
using Aspose.Cells;
using System.Collections.Generic;
using LoggerLib;
#r UserData/Net/Utilities.cs.dll

namespace MyApps
{
    public class TestApp
    {
        private readonly string path;
        private readonly Workbook workbook;
        private readonly Worksheet reportWS;
        private readonly Dictionary<string, Cell> cells;

        public TestApp(string path, string password)
        {
            this.path = path;
            LoadOptions loadOptions = new() { Password = password };
            workbook = new Workbook(path, loadOptions);
            var worksheets = workbook.Worksheets;
            reportWS = worksheets["Report"];

            cells = new Dictionary<string, Cell>
            {
                { "E", worksheets.GetRangeByName("E")[0, 0] },
                { "G", worksheets.GetRangeByName("G")[0, 0] },
                { "Iy", worksheets.GetRangeByName("Iy")[0, 0] },
                { "J", worksheets.GetRangeByName("J")[0, 0] },
                { "Iw", worksheets.GetRangeByName("Iw")[0, 0] },
                { "le", worksheets.GetRangeByName("le")[0, 0] },
                { "Mo", worksheets.GetRangeByName("Mo")[0, 0] }
            };
        }

        public double GetValue(string cellName)
        {
            if (cells.TryGetValue(cellName, out var cell))
                return cell.DoubleValue;
            throw new ArgumentException($"Invalid cell name: {cellName}");
        }

        public void SetValue(string cellName, double value)
        {
            if (cells.TryGetValue(cellName, out var cell))
                cell.PutValue(value);
            else
                throw new ArgumentException($"Invalid cell name: {cellName}");
        }

        public void Calculate()
        {
            workbook.RefreshDynamicArrayFormulas(true);
            workbook.CalculateFormula();
        }

        public void Export(string path)
        {
            PdfSaveOptions pdfSaveOptions = new()
            {
                CustomPropertiesExport = Aspose.Cells.Rendering.PdfCustomPropertiesExport.Standard
            };

            foreach (Worksheet ws in workbook.Worksheets)
                ws.IsVisible = ws == reportWS;

            workbook.Save(path, pdfSaveOptions);
        }

        public void Close()
        {
            workbook.Dispose();
        }
    }
}Once all above steps are complete, select all 4 scripts in the tree browser and click on the compile icon on the menu bar to make the app available in current session. If “Publish” option under app settings is ticked, the app would automatically compile at Y3A startup.
After running the app and setting the parameters, clicking on export would open a prompt to set a PDF export location. Refer below for the excel file and sample PDF output.